저번 달에 Flutter를 사용하여 SRT 자막을 지원하는 간단한 비디오 플레이어를 만들어 보았습니다
하루 만에 만들 수 있을 것 같아서 작성을 시작했는데 (늘 그렇듯이) 예상 시간 보다 2배 정도 걸렸습니다.
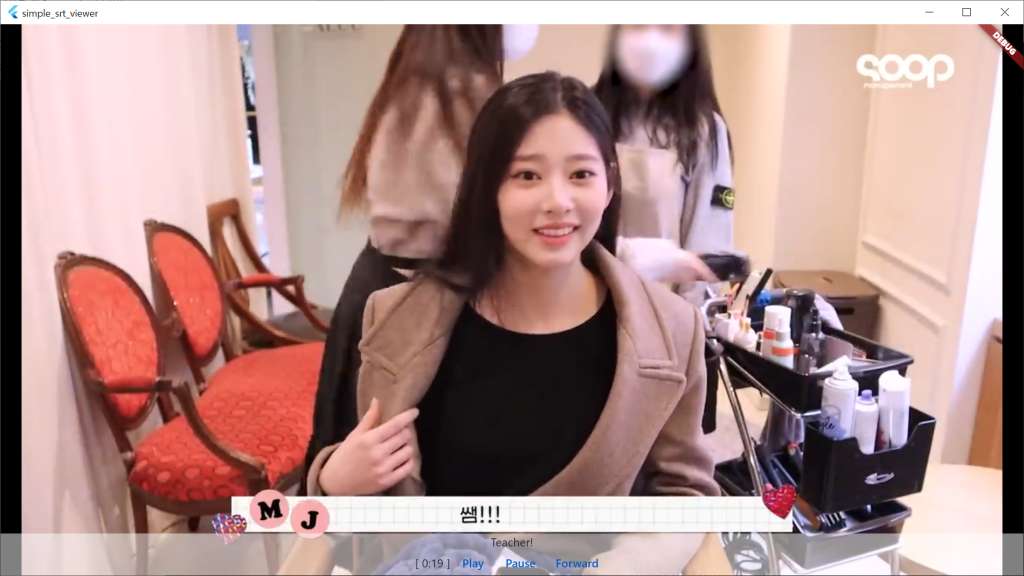
스샷의 영상은 ‘매니지먼트 숲 MANAGEMENT SOOP Official’채널의 ‘(ENG)민주의 음악중심 마지막 날 VLOG | Minju Vlog’ 영상이며, 영어 자막은 Whisper를 사용하여 만들었습니다
This file contains bidirectional Unicode text that may be interpreted or compiled differently than what appears below. To review, open the file in an editor that reveals hidden Unicode characters.
Learn more about bidirectional Unicode characters
| import 'dart:io'; | |
| import 'package:flutter/material.dart'; | |
| import 'package:path/path.dart' as Path; | |
| import 'package:desktop_drop/desktop_drop.dart'; | |
| import 'package:video_player_win/video_player_win.dart'; | |
| // Simple video player with subtitle support (Flutter) | |
| /* Using package | |
| intl, desktop_drop, video_player_win | |
| */ | |
| void main() { | |
| runApp(const MyApp()); | |
| } | |
| class Subtitle { | |
| final int index; | |
| final int startTime; | |
| final int endTime; | |
| final List<String> text; | |
| Subtitle(this.index, this.startTime, this.endTime, this.text); | |
| } | |
| class SrtSubTitle { | |
| List<Subtitle> subtitles = []; | |
| int parseSrtTimeToSec(String srtTime) { | |
| final timeParts = srtTime.split(':'); | |
| final hour = int.parse(timeParts[0]); | |
| final minute = int.parse(timeParts[1]); | |
| final secondParts = timeParts[2].split(','); | |
| final second = int.parse(secondParts[0]); | |
| final millisecond = int.parse(secondParts[1]) > 500 ? 1 : 0; | |
| return second + minute * 60 + hour * 3600 + millisecond; | |
| } | |
| void parseSrtFile(String filePath) { | |
| subtitles.clear(); | |
| final file = File(filePath); | |
| if (file.existsSync() == false) { | |
| return; | |
| } | |
| final lines = file.readAsLinesSync(); | |
| int currentIndex = 0; | |
| for (int i = 0; i < lines.length; i++) { | |
| final line = lines[i].trim(); | |
| if (line.isEmpty) { | |
| continue; | |
| } | |
| if (int.tryParse(line) != null) { | |
| currentIndex = int.parse(line); | |
| } else if (line.contains('–>')) { | |
| final timeSplit = line.split('–>'); | |
| final startTime = parseSrtTimeToSec(timeSplit[0].trim()); | |
| final endTime = parseSrtTimeToSec(timeSplit[1].trim()); | |
| final textLines = <String>[]; | |
| i++; | |
| while (i < lines.length && lines[i].trim().isNotEmpty) { | |
| textLines.add(lines[i].trim()); | |
| i++; | |
| } | |
| final subtitle = Subtitle(currentIndex, startTime, endTime, textLines); | |
| subtitles.add(subtitle); | |
| } | |
| } | |
| return; | |
| } | |
| bool _timedSubtitle(Subtitle subtitle, int timeStampSec) { | |
| return (subtitle.startTime <= timeStampSec && | |
| timeStampSec < subtitle.endTime); | |
| } | |
| Subtitle? getCurrentSubtitle(int timeStampSec) { | |
| if (subtitles.isEmpty) { | |
| return null; | |
| } | |
| int subtitleLength = subtitles.length; | |
| for (int i = 0; i < subtitleLength; i++) { | |
| final subtitle = subtitles[i]; | |
| if (_timedSubtitle(subtitle, timeStampSec)) { | |
| return subtitle; | |
| } | |
| } | |
| return null; | |
| } | |
| } | |
| class MyApp extends StatelessWidget { | |
| const MyApp({super.key}); | |
| @override | |
| Widget build(BuildContext context) { | |
| const title = 'Simple video player with subtitle support'; | |
| return MaterialApp( | |
| title: title, | |
| theme: ThemeData( | |
| colorScheme: ColorScheme.fromSeed(seedColor: Colors.blueAccent), | |
| useMaterial3: true, | |
| ), | |
| home: const MyHomePage(title: title), | |
| ); | |
| } | |
| } | |
| class MyHomePage extends StatefulWidget { | |
| const MyHomePage({super.key, required this.title}); | |
| final String title; | |
| @override | |
| State<MyHomePage> createState() => _MyHomePageState(); | |
| } | |
| class _MyHomePageState extends State<MyHomePage> { | |
| WinVideoPlayerController? controller; | |
| SrtSubTitle srtSubTitle = SrtSubTitle(); | |
| @override | |
| void initState() { | |
| super.initState(); | |
| } | |
| @override | |
| Widget build(BuildContext context) { | |
| Widget? playerWidget; | |
| if (controller != null) { | |
| Widget overlayWidget = Container( | |
| color: Colors.white.withOpacity(0.5), | |
| child: ValueListenableBuilder( | |
| valueListenable: controller!, | |
| builder: (context, value, child) { | |
| final minute = controller!.value.position.inMinutes; | |
| final second = controller!.value.position.inSeconds % 60; | |
| final timeStampSec = second + minute * 60; | |
| final subtitle = srtSubTitle.getCurrentSubtitle(timeStampSec); | |
| return Column(children: [ | |
| subtitle == null | |
| ? const Text('') | |
| : Text(subtitle.text.join('\n')), | |
| Row(mainAxisAlignment: MainAxisAlignment.center, children: [ | |
| Text("[ $minute:$second ]"), | |
| TextButton( | |
| onPressed: () => controller!.play(), | |
| child: const Text("Play")), | |
| TextButton( | |
| onPressed: () => controller!.pause(), | |
| child: const Text("Pause")), | |
| TextButton( | |
| onPressed: () => controller!.seekTo(Duration( | |
| milliseconds: | |
| controller!.value.position.inMilliseconds + | |
| 10 * 1000)), | |
| child: const Text("Forward")), | |
| ]) | |
| ]); | |
| })); | |
| playerWidget = Stack(children: [ | |
| WinVideoPlayer(controller!), | |
| Positioned(bottom: 0, left: 0, right: 0, child: overlayWidget) | |
| ]); | |
| } | |
| return Scaffold( | |
| body: DropTarget( | |
| onDragDone: (details) { | |
| var path = details.files[0].path; | |
| var c = WinVideoPlayerController.file(File(path)); | |
| if (controller != null) { | |
| controller!.dispose(); | |
| controller = null; | |
| } | |
| c.initialize().then((value) { | |
| if (c.value.isInitialized) { | |
| var srtFilename = "${Path.withoutExtension(path)}.srt"; | |
| srtSubTitle.parseSrtFile(srtFilename); | |
| c.play(); | |
| setState(() { | |
| controller = c; | |
| }); | |
| } else { | |
| debugPrint("video file load failed"); | |
| } | |
| }); | |
| }, | |
| child: playerWidget ?? | |
| const Center(child: Text("Drop video file here")))); | |
| } | |
| } |